How to start an online store with WordPress?
Do you wish to launch your own online store? We know it can sound a little scary when you don’t have the right technical knowledge with you. But hey, relax! Stress no more.. Ideatebox is there to help you out in every step possible.
We will walk through the entire process of developing an online store via WordPress.
So let’s get started!
First of all, you are not alone in this. Having helped hundreds of users launch their online store, we decided to create the most detailed guide on how to build your WordPress online store
(step by step).
In this tutorial, we’ll guide you through how to set up an online store using WooCommerce in WordPress.
What Does it take you to start an Online Store?
There had never been a better time than today for starting an online company.
Anyone with a computer,can get started in minutes and without having any special expertise.
The three things you need to start an online store are:
- A domain name concept (this will be the name of your online store i.e. creatingideas.com)
- A web hosting account (this is where your website lives on the internet)
- Your indivisible 30 minutes attention.
Yeah, it’s so easy actually!
With WordPress you can set up your own online store in just 30 minutes.
Step 1 : Establish your framework for Online Store.
Many consumers make the biggest mistake, not choosing the best site for their online store. Luckily you’re here and you’re not going to make that mistake.
We will suggest two popular Ecommerce platforms: WordPress + WooCommerce.
A domain name, web hosting and SSL certificate is required to configure your shop.
A domain name is the web address of your website to access the website, that is what users type in their browsers (for example: google.com).
Web hosting is the location where your internet site resides. It is the house on the internet at your website. Web hosting is required on any website on the internet.
While, SSL certificate adds to your website a special security layer to enable you to accept confidential information such as credit card and other personal details.
After that you’re done with the installation part, go ahead and sign in to your cPanel. You will be greeted with a popup that tells you that WordPress is pre-installed on your website with WooCommerce.
Only click the ‘ Login to Your Account ‘ button and it will take you to the dashboard of your WordPress account.
So congratulations, you have completed hosting and part of the domain setup.
Setting up your WordPress website and then your online store is the next step.
For WordPress installation tutorial, go to our WordPress installation tutorial. (https://ideateboxsolutions.blogspot.com/2020/03/now-learn-and-create-your-own-wordpress.html)
Step 2 : Establish your WordPress store.
There are a few items like money, fees, and shipping details you need to set up before you can start selling. On your WordPress admin pages you’ll see a ‘ Welcome to WooCommerce ‘ message. Go ahead and in the notification, click on the “Run the wizard” button.

This will open the Setup Wizard for WooCommerce, where you need to click the “Let’s go” button to continue.

WooCommerce requires few important pages like cart, wallet, shop and checkout. To build these pages automatically, you can click on the continue button.

That will get you to the next level. Now you’re going to have to say WooCommerce
where your store is and which currency and unit measure to use.

Tap on continue button to move on after choosing your position and the currency. First you need to enter information about shipping and taxes.

WooCommerce can be used for selling both digital downloads and shipping-needed physical products. You need to check the box if you are shipping merchandise or if you are just selling digital products you should leave it unchecked. The next question you need to tackle is tax. WooCommerce will help you measure your prices automatically, and add taxes.
If you’re confused then you should leave it unlocked. You can use WooCommerce settings to add tax details later.
Hence, to proceed click on the continue button. Next you’ll be asked to select your online store payment form.

By defualt, WooCommerce comes with PayPal, PayPal Standard and Stripe gateways to enable payments. For WooCommerce there are several other payment methods available which you can use later if you need to. The best way to accept payment is to use regular PayPal. Only type your email address in PayPal and click on the Continue button.
Most people like to use PayPal as well as Stripe. By using Stripe, you allow your users to enter details about their credit card on the checkout page without having to leave your site to go to PayPal. You can configure Stripe on the WooCommerce screen by following the instructions. Once you’ve done your online store WooCommerce is all setup.

To exit the setup wizard, you must click on the “Return to WordPress dashboard” button. After the WooCommerce setup has been completed, you are now able to add items to your online store.
Step 3 : Adding products to your Online Store
Next let’s add the first items to your online store.
To add a new feature, you need to visit Products >> Add New tab.

Give the product a title first, and then a detailed summary.
You can see the “Product Categories” box at the right hand column. To create a category for this product click on the “+Add new Product Category” at the right hand column. In this way you and your customers can conveniently find and search items.

Scroll a little down and you’ll find the Customer Data tab. Here is where you can have details relevant to the product such as price, inventory, shipping, etc.

You can see a box below about the product data box to add short summary of the product. This short description will be used when users are viewing multiple products on a page.

Eventually, you can see boxes on your right hand column to add a picture of the main product and a product gallery.

Once you’re pleased with all the product details you’ve added to your website, you can press the Publish button to make it public. Repeat the process of adding more products as needed.
Step 4 : Customize and pick your theme for your Online store
Themes monitor how the users look at your WordPress pages when they visit it. We also monitor how the goods are presented in a WooCommerce store. There are thousands of WordPress themes available which are paid and free.
Head over to Appearance » Change tab. This will open theme customizer, where you
can change the settings of different themes.
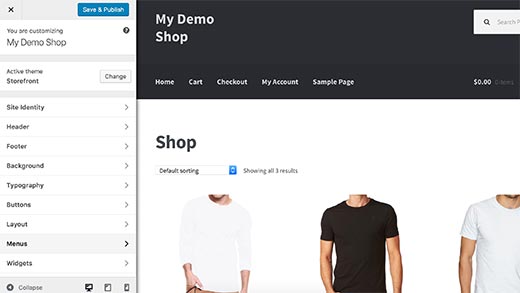
If you don’t like the Storefront theme, then please visit Appearance >> Themes page to use another theme.

Step 5 : Extend your Store Online with Plugins
Now that you’ve got your online store ready, you’re probably going to want to start by adding
elements to your website including a contact form, page and more. You need to use WordPress plugins to further configure WordPress and add features such as communication types, galleries, sliders, etc..
WordPress plugins are software where you can add new features to your website. More than 46,000 WordPress plugins are available.
Learning to build your online business with WordPress.
WordPress is extremely strong and for the beginners we’ve great tutorials.
At Ideatebox, our main aim is to provide cutting-edge helpful WordPress tutorials that are easy to understand even for website owners who are non-techy WordPress (see more of us).
We hope this tutorial has helped you learn how to build an online store.
Feel free to connect with us on Facebook and on Twitter!