API FOR BEGINNERS –
What is the best way to build an API?
How do I build a REST API?
What is the easiest way to create an API?
How do I create an API for my website?
How does one learn API programming?
How can I build an API for Android/iOS use?
If you have similar questions in mind then you’re at the right place. Because, we have all the answers to your questions.
We will start from the basics. In this first part of my API blog series, I will be telling you exactly what API is, how does it work, and it’s various functionalities.
We will continue with other functionalities, and ways of handling errors and mistakes and some testing methods of API in my second blog.
So, let’s begin!
WHAT IS AN API?
Application-programming interface (API) is a collection of Internet-based software application or Web tool programming instructions and standards to access. A software company releases its API to the public so that products that are operated by its service can be built by other software developers.
Not to mistaken, an API is not a user interface but, is a software-to-software interface. With APIs, without any user knowledge or intervention, applications talk to each other.
Let’s take an example to help you understand this in a better way.
Ex- Any movie ticket website uses an API when you purchase the tickets online. You enter your credit card details & submit the information to a remote application that verifies whether your information is right or not. The remote application sends a response back to the movie ticket website after payment is verified, stating that it is OK to issue the tickets.
You only see one gui as a user — the movie ticket website — but behind the scenes, many apps use APIs to work together. This form of integration is seamless, as the user never notices when software functions are moved from one program to another.
There are APIs everywhere. They help us to integrate features of third parties, connect enterprise systems and exchange information between apps. Learning how to construct an API turns digital superheroes into regular developers.
Our guide to unlocking your superpower is here.
At Ideatebox, for almost all of our projects, we develop internal APIs.
Knowing how to construct an API will give you a number of benefits, such as higher speed of development, simplified architecture (backend/frontend separation), improved micro-service scalability, simpler integrations, easier testing, better security, easier GDPR enforcement, and other regulations.
It takes more time to construct an API than just programming a server.
Building an API can be thought of as a workflow consisting of many levels, each with its own extra steps. Irrespective of which stage you are in, your API workflow will be improved by Ideatebox.
An API can be generated in five steps:
- Preparation
- Design & Prototype
- Implement
- Test
- Monitor and iterate
Step 1: PREPARATION
Begin with your targets and intended users. Both for your company and its intended users, your API can offer value.
Those would be your colleagues if you were building a private API. You’ll need more data on your target audience with public APIs:
- Who are the developers (their domain, needs, objectives, etc.) that could benefit from your API?
- How can you integrate their requirements into your API?
- How can you provide a better experience as a developer?
- What tools (developer programmes, SDKs, documentation, educational resources, etc.) do you need to provide along with your API?
Knowing the needs of your customers will help you identify requirements and ensure your API’s long-term success.
Now, iIt’s time to learn how to design an API.
Step 2: DESIGN & PROTOTYPE
It is time to begin & carve the API out. You will define how your API will look in this stage, create its stub execution, and verify it with everyone involved in the workflow.
You should come up with a design that suits your specifications and represents the needs of developers who will use your API before you write the first line of code.
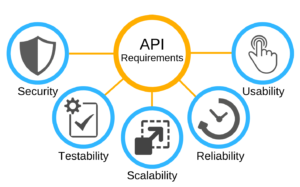
An API has to fulfil a number of specifications, irrespective of the architectural style:
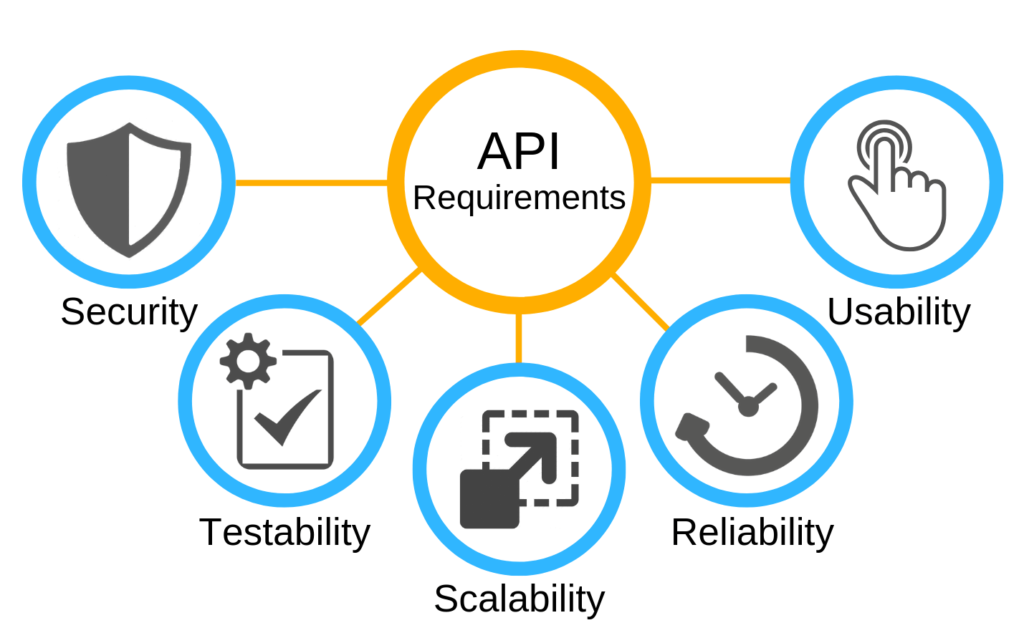
- Usability: developers should, with minimal effort, be able to learn and use your API.
- Reliability: there should be minimal downtime on the service.
- Scalability: load spikes should be handled by the system.
- Testability: it should be possible for testers to detect any defects easily.
- Security: You can protect the API against malicious users.
Here’s how these criteria can be met.
1. Separate architecture of API into multiple layers
Between the client and the API logic, those layers, each responsible for a single requirement, will sit.
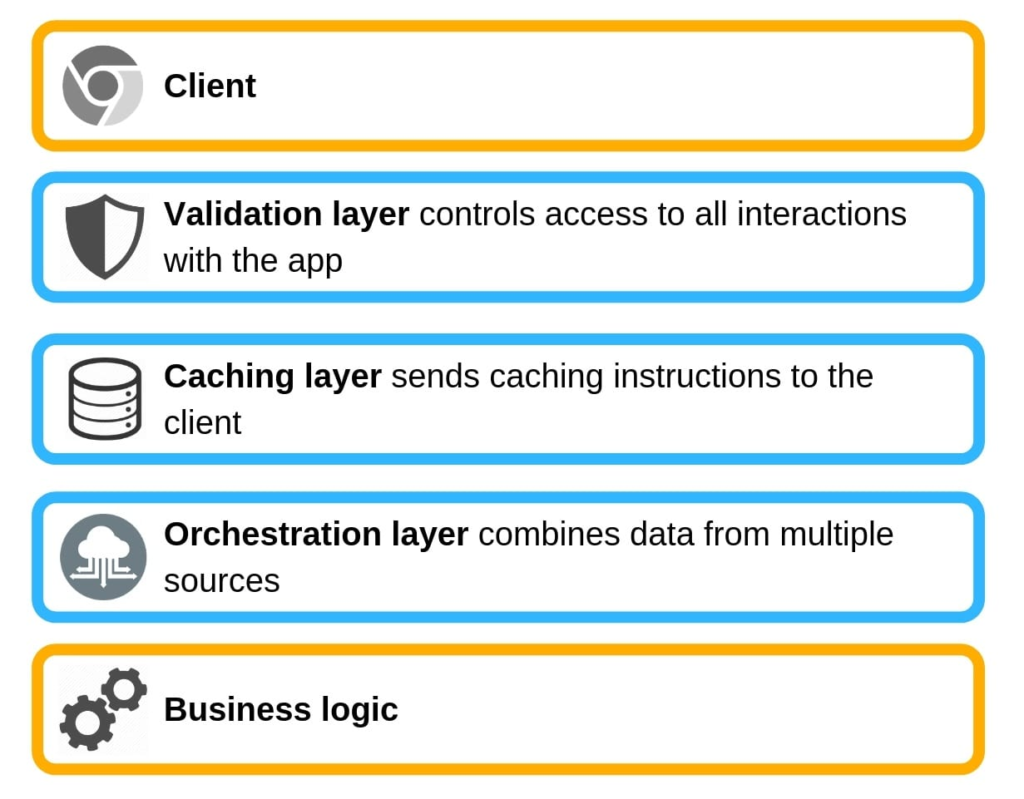
Keep your API as small as possible for now. You can add functionality anytime, but can never remove it.
2. Pick your type of architecture: REST vs SOAP
Two common API architecture approaches exist:
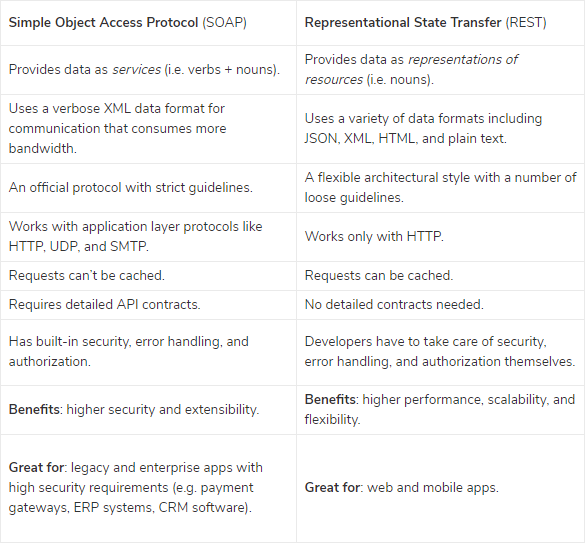
REST is currently the most common approach to the creation of web APIs. Its versatility allows you more freedom to build an API as long as six constraints are met by your architecture:
- Statelessness: as no information about prior experiences is retained by servers, each call can provide the appropriate context.
- Separation of concerns: the backend of the app should be built separately from its UI.
- Answer caching: servers can notify clients if the answer is cacheable.
- Multiple levels of communication between the client and the server.
- Uniform UI: calls from various clients ( i.e. one resource must have one URI) look alike.
- Code upon request: API responses may include executable code if requested.
*Developers can get up to speed even quicker, as REST relies on a familiar HTTP protocol.
REST should use a JSON format that is human-readable. It’s lighter and easier to parse than XML, and it fits for all programming languages.
If your API needs to work with both JSON and XML (e.g. legacy systems), through request headers, you can modify the output depending on the requested format.
When you build REST APIs, it is suggested to adopt the OpenAPI Specification(https://swagger.io/specification/). For building API interfaces, it’s a generally accepted and language-agnostic standard. It helps both the computers and the humans to understand all the features of API without accessing the source code or reading the documentation.
The standard can be used to generate documentation, clients, and servers in various languages.
3. Think about safety
APIs (e.g. inappropriate authentication, URI API keys, unencrypted confidential data, injections, replay attacks, stack trace leaks, DDoS attacks, etc.) can be a major source of vulnerabilities.
That’s why you should pay enough attention to security at the design stage. You have to make sure that you don’t unintentionally reveal confidential data to hackers or leave a loophole.
Most APIs have 4 security layers:
- Identification
To identify developers accessing your API, you can use unique randomised IDs called API keys. They allow user tracking and “unlawful” activity to be detected.
As API keys are not encrypted, to protect your API, you will need other security measures. Moreover, sending them in URI makes it possible to extract the keys from browser history.
Sending the keys via the Authorization HTTP header is recommended, as it is not recorded in the network logs.
- Authentication
Logins and passwords prove that those they pretend to be are developers accessing your API.
For authentication, you can use OpenID(https://openid.net/connect/), which redirects developers to an authorization server to validate their identity.
- Authorisations
Users that are authenticated need a list of permissions that match their level of access.
Our favourite form for authorization is OAuth2(https://oauth.net/2/). As it depends on tokens(https://auth0.com/docs/tokens/overview-access-tokens) instead of usernames and passwords, it’s quicker than other mechanisms.
- Encryption
To protect API traffic against credential hijacking and eavesdropping (even with private APIs), it is recommended to use SSL/ TLS encryption.
The use of end-to-end encryption for sensitive data ( e.g. medical records or payment details) is another requirement. In logs and trace tools, you can also use ‘tokenization’ or mask the data from appearing.
Step 3: DEVELOP YOUR API
It is time to start building after you’ve completed your API design! Here are a variety of quality standards to help you create an API:
Develop endpoints for APIs
Endpoints are URLs that vary on the method used in the request and hence, they return various responses accordingly.
Your endpoints should include information as nouns using the REST architecture, non verbs+nouns (e.g. https:/www.yoursite.com/users, not https:/www.yoursite.com/get-user-data).
The part of the verb comes in the form of HTTP methods that are used in headers. They correspond to a database’s CRUD functions.
- GET is used from your database to READ resources. Since GET is unable to change data, it is considered a secure process. The method can return either the 200 OK code (if the resource is found), the 404 Not Found code (if the resource is missing) or the 400 Bad Request code (invalid syntax).
- POST is used to CREATE a new subordinate resource in your database. If the resource has been created successfully, the method should return the 201 OK code together with the location header and the request status description entity. You can return either a generic 200 Ok code or 204 No Content if the method has created a resource that can not be identified via a URI.
*When generating a new resource using a POST request, the impact must be limited to the new resource.
- PUT is used to UPDATE the entire resource. When updating an existing resource, the method should either return a 201 OK code (if a new resource was created) or 200 OK/204 No Content.
- PATCH is used in order to upgrade a part of a resource.
- DELETE is used to DELETE a resource.
Requests for GET, PUT, DELETE, HEAD, and PATCH must be idempotent (repeating the same resource call must lead to the same state.)
It is recommended to always use plural for your resources for the sake of consistency and follow standard naming conventions(https://restfulapi.net/resource-naming/).
So guys, this was it. In the second part of this blog, I will be talking about handling mistakes and using other smart features of API.
Till then stay tuned to our website and read some exciting and informative blogs. Be a tech savyy!