Hey fellas!!
Dzein Dobry 🙂 ( My Polish greetings to all of you!)
Firstly, before beginning with the second part on API series, I would like to thank you guys so much for liking our posts and finding them useful enough.
We are blessed to have you all, showering much love upon us!
We will keep on “infotaining” you as always 😉
In my previous blog, I explained the basics of API and some of it’s exquisite features.
In its second part, I will be talking some more on API’s features and attributes and some ways, tricks & tips to handle APIs.
So lettttts beginnnn……….
Now comes the question,
“How To Handle any exceptions and mistakes?”
Your API can handle all exceptions properly and return HTTP status codes that are right instead of a generic 500.
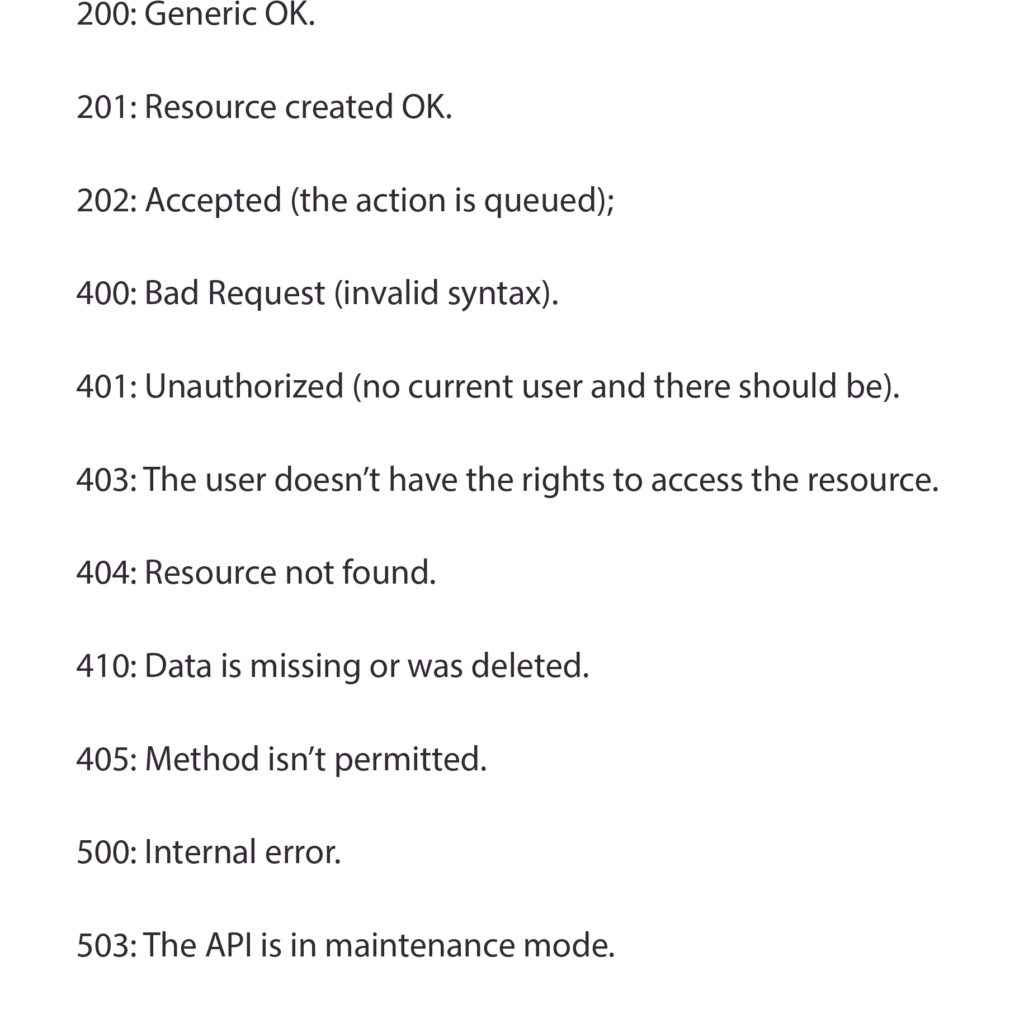
Thats’s because if due to an exception, an API is unable to complete any operation, it is recommended that you recognize the error that had caused the trouble in the answer message.
*NOTE: Be careful, as APIs can leak sensitive information in error messages via stack traces. The names of the servers, modules, classes, versions, and SQL queries that are used in the project can be seen.
In the aforementioned tools, this information can be used to exploit known vulnerabilities.
So make sure a balanced error message without stack traces is returned by your API.
To standardise your error messages, you can use an API gateway .
Follow this link for reference (https://docs.apigee.com/api-services/content/understanding-handling-request-response-data).
Also, avoid revealing sensitive information. Stick to the issue.
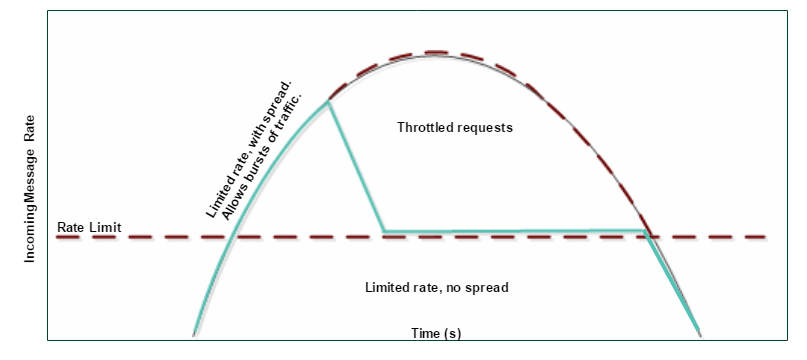
Using the throttling option
Sudden traffic spikes can interrupt your API (as this is also used in attacks against Denial of Service).
What You Can Do Instead?
Use traffic quotas (a cap on the amount of requests that an app can make per hour / week / month, etc.), spike arrests (a rate at which an app can make requests per minute / second + throttle exceeding calls) or simultaneous rate limits (an app can not link to your API more than x in parallel).
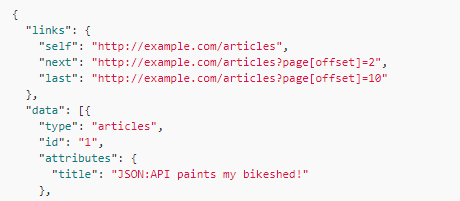
Using Navigation Hyperlinks for similar services
Any of the assets would have ties to other assets. Yoursite.com / users , for example, applies to all users, while yoursite.com/users/123 points to a single user. When a GET request is received by your API, links to all relevant resources in the response body should be given. Supported request methods can also be represented by these links.
Implement pagination and criterion-based search
API responses sometimes contain too much data. In an e-commerce app, for instance, there can be thousands of products relevant to a search. It would be extremely taxing on your database to send all of that in a single response.
You can break the data into many “pages” to decrease response times and protect your API against DDoS attacks. Each page has its own URI for easier navigation. In one go, the API can view only a portion of data and let users know how many pages are left.
There are several methods of pagination to choose from:
- HTTP range headers (for binary data);
- Fixed pages of data (all pages are equal in size);
- Flexible pages of data (the client app specifies the size of the page);
- Offset and count (the API views it as a collection of items instead of dividing the data into pages. The client can specify a starting index and the number of items to be returned); and
- Values default.
Use different filtres, such as time of creation or price, to facilitate sorting, and perform search via a query string.
Enable Overriding HTTP Method
You can allow your API to override request methods with a custom X-HTTP-Method-Override header, as many firewalls don’t support PUT, PATCH, and DELETE methods.
Implement caching on the client-side
Caching will save bandwidth and decrease latency as the recently retrieved data would not have to be loaded by clients.
Your API might send a Cache-Control header after receiving a GET request, specifying whether the data in the response is cacheable. The header can also indicate when the information is deemed to have expired.
Optimize your Results API
API responses can be delayed by requesting vast binary resources such as images. Allowing the Accept-Ranges header for GET requests for large resources is one way to prevent such problems.
You can also cut the size of large objects using HTTP compression.
By combining compression with streaming, you can reduce the latency even further. If large resources are needed by a client, you can partition the responses. The transmission ends when the client receives the last chunk of data that has a zero size.
If you can’t be sure about the amount of data in the response, it ‘s recommended to use a Transfer-Encoding: chunked header instead of a Content-Length header.
If your API detects that the data in a request is higher than the limit specified, the 413 (Request Entity Too Large) code can deny the transmission and respond.
Developing the logic of business
The open API design allows you to use a variety of languages to write business logic.
Based on your design, you can use Swagger Codegen(https://swagger.io/tools/swagger-codegen/) or similar tools to generate boilerplate code. The tool provides the scaffolding needed so that you can concentrate on logic.
Write documentation with the API
To auto-generate docs from your OpenAPI definition layer, you can use various API documentation resources. Your docs should include all the requisite details for developers to use your API:
- Scheme for authentication;
- Description of endpoints (their purpose and relationships to other endpoints);
- Sponsored requests and replies from HTTP;
- All of the interfaces, classes, designers, and exceptions;
- Each URI’s methods, structure, and accepted parameters; and
- Descriptions of errors.
You can get away with simple reference documentation if you develop a private API.
NOTE: With a public API, your documentation’s quality will directly affect its adoption rate. So provide, accompanied by examples, SDKs, and tutorials, the best documentation you can.
Add versions
You’ll likely want to expand the functionality of your API at some point.
Making sure that these changes do not break the apps that rely on the API is critical.
Versioning helps you to define the exposed resources and features of your API so that users can guide requests to a specific resource / feature version. In the request header or in your URL (e.g. yoursite.com/v1/users), you should include a new version.
And don’t forget to check for backward compatibility with your API.
You can add a mediation layer to serve as a single service point for various versions of your API, to make changes easier for developers. It can also provide greater scalability, security and simplify the experience of developers.
Each version of your API should obtain documentation of its own.
Now that you’ve learned how to write an API, it’s time to …
Step 4: TEST YOUR API!
Well bravo! That now you have finally created your own APIs. Now it’s time you start checking your API with API virtualization.
You can perform various types of tests, depending on your priorities: validation, functionality , reliability, load, security, etc.
Here are a few general API testing rules:
- In isolation, test API functions
- Use realistic data for results that are realistic
- Testing under a range of network conditions that users may encounter in manufacturing
- Simulating errors and edge cases by modifying responses rapidly and
- For performance testing, don’t use live APIs.
Check out our guide to API testing for a more detailed overview!
The last one, but not the least –
Step 4: MONITOR AND ITERATE YOUR API ON FEEDBACK
You’ll have to monitor its success metrics once your API is deployed.
Depending on your objectives and the type of your API, you may want to monitor:
- Uptime for API
- Solicitations per month
- Unique Users Monthly
- Times of Response
- CPU/memory usage of the server
- Time for the API key to be received
- Time for the first 200 OK answers
- Time to first profitable app
- Revenue per month (for monetized APIs), etc.
To track response time, results, uptime, availability and more in real time, you can use tools like Postman Monitoring
(https://www.getpostman.com/monitoring), Uptrends(https://www.getpostman.com/monitoring), or Amazon CloudWatch (https://aws.amazon.com/cloudwatch/) (AWS-only).
You’ll also have to gather user reviews and integrate it into next iterations of your API.
Now that you know how to build an API, it’s time to put this experience into practice. And you can always drop us a line if you need expert advice.
That’s not it. For our techhy buds, we have prepared a 3 part series on RESTful APIs or REST APIs, whatever you may like to call that.
So, do check that out and get a detailed and thorough understanding on APIs and REST APIs.
Adios!! (My Spanish Goodbye to all of you 🙂 let’s catch up in other new exciting & informative post!